Sunday, December 28, 2008

Next time, remember the sunflower seed!

 
Snow at the Stony Swamp trail

One of the things I like about getting outside to photograph, is that you never know what you are going to experience.   Last week I decided to go out after a big snowstorm to photograph the woods on a local nature trail.  I got out my snowshoes and started walking along the trail.  When I stopped to photograph some shadows across the snow, I realized that I had some friends following me -- a flock of chickadees looking for some easy food.  When I set up my tripod, they started buzzing me, landing on my hat, gloves, and even my camera and lens.  I wish I could have taken a video of the action -- I don't think I've ever had such a concentrated amount of activity by chickadees.  It was a huge amount of fun.

Next time, I'll have to remember to bring some sunflower seeds, so I can at least repay this flock for their attention.

. . . Rob Williams
http://www.robwilliams.ca

Sunday, December 7, 2008

Mining Past Work

Grass Flowing in the Oxtongue River

When November arrives and the photographic opportunities dry up, I often end up looking through the year's photographs (both processed and unprocessed) to see what I've missed. Often the initial work that I have done on my raw images misses some interesting work that didn't strike me the first time through.

This weekend I was looking through some older photographs, and I came across a couple of photographs of some grass growing and flowing in a river. The colour of the grass in the dark brown water wasn't particularly attractive, but I loved the flowing lines of the grasses. I set the satruation to zero to see what it looked like in B&W, and then adjusted the contrast and brightness, and the results were quite striking.

Don't be too hasty to throw out old images -- a second look might turn up some gems.

. . . Rob Williams
http://www.robwilliams.ca

Sunday, November 23, 2008

Linux Photography: Photograph Management and Thumbnailing

Photo management is one area in which I have struggled to find a suitable Linux-based tool.   First, I need to elaborate what features I need in a photo management tool -- there are a lot of tools out there that do the basic job of displaying thumbnails, but there is a wide range of features that they offer.

My basic requirements are the following:
  • display thumbnails of the images
  • display image information: filename, date, size, resolution, as well as metadata information: exif, IPTC and xmp data
  • choice of image information to display with the thumbnails
  • edit iptc data, particularly caption, copyright, and keywords.  I use this information for images I send to clients as well as stock agencies.
  • let me organize my images.  There are different options that are offered in each tool, such as tags or keywords, file system operations (move, copy, link) and so on.  I really like to be able to use the file system to organize my files from within the file management program -- this avoids having to remake the thumbnails after ever move or copy.  However, the bottom line is that I must have some mechanism to manage the image files.
  • link to my photo editor.  Most photo management tools allow the user to edit the image.  However, most of the operations are simple manipulations that I have already done using the raw converter.  To make further changes, I need my photo editor, and it's more convenient to invoke it from the photo management tool than to use it stand-alone.
And, I have one big anti-requirement:
  • Don't make me "import" photographs into the program and hide the file system from me.  The "import" is aimed at digiCam users, who want to copy files from their camera to the file system.  That's fine, but it shouldn't be the only way to view photographs.  I use the file system to manage my images, and I need to use it in my photo management tool.  I know that the tool needs to create thumbnails, and it may store information in a database.  The tool may hide this process in an "import".  However,  I don't want to "import" every new photograph in a directory.  If the contents of a directory change, the tool should take care of it automatically. 
I tried just about every program I found, but there are a couple of notable tools: F-Spot, gThumb, digiKam, and Picasa.

F-Spot is a tool that appears to be aimed casual users rather than advanced photogaphers.  It's user interface is simple, and geared to importing photographs (from a digital camera), viewing them by date, and performing some simple manipulations.  It allows you to assign tags to photos, as well as a rating (one to five stars).  Also, it allows you to create a hierarchy of tags, which is a useful concept.

Unfortunately, F-Spot hides the file system, and just doesn't have a good set of features for my use.

gThumb is a good program with a lot of my requirements covered.  In particular, gThumb lets me browse the file system, and view images wherever they are found.  It lets me copy and move images in the filesystem, and invoke my photo editer on a selected image.  It also allows me to add categories (like a tag).

gThumb has a good "image" view mode, that shows the user a good set of image information in one panel, allows you to add comments in another panel, and manipulate the image in a third panel.

The main shortcoming of gThumb is that it lacks metadata manipulation. Tbhe user can view exif data, but not IPTC or XMP data, and no metadata can be edited.

digiKam is another potentially useful tool.  The first impression (for me) was disappointing -- it hides the file system, and makes you create "Albums".  It then imports the images into the album, and lets you view the thumbnails.  Furthermore, if the file system changes (a new file is added), you have to explicitly add the new file to the album. 

However, thanks to a tip from Fred (see the comments below), you can configure the "Album Library Path" under Settings -> Configure digiKam...  If you set this to your photograph directory, the complete directory structure can be browsed, and digiKam watches the file system for updates.

digiKam has some really good features.  The right hand panel has a good image information -- from file information, to exif and IPTC viewing.  The same panel also has a histogram, and a tab that lets you set tags, a comment, and an image rating.  The tags seem to be written to the IPTC keyword field, but I don't think the comments are written to a IPTC field.

Picasa: I downloaded Picasa version 3 Beta, and tested it with a large directory of images.  Overall I like Picasa once it imports the images and is able to display them.   Picasa's import is better than digiKam in that there is a Folder Manager that lets you browse the file system and select folders (and their subfolders if you want) to monitor.  Picasa then imports the images and watches the folder for changes.   It still hides the file system from the main interface, but it's not completely hidden.

There is some organization capability as well.  You can create Albums and move images into an album.  You can also move an image to a different folder or split a folder into two.

I'm also pleased that Picasa can open an image in an external editor.  When you select an image and right click, you can choose "Open File" which will open the file using the default application.

Picasa has a good set of image editing.  Although this is not a main requirement, if a tool does this well, I will use it from time-to-time.  Picasa's tools are good, and even provide a useful dust and scratch removal tool.

Picasa is weak in terms of metadata viewing and editing, although it's not lacking completely.  Tags can be added to an image, which show up as IPTC keywords.  A caption can also be added, which is stored as the IPTC caption field.  These two fields can be viewed by right-clicking an image to show Image Properties (although it doesn't show the caption for some reason).

Picasa is a polished program as you might expect from Google.  However, it is aimed at the casual user, rather than an advanced photographic user.  It has many features that I don't really care about, and it is weak in one critical area -- metadata editing.

Picasa, digiKam and gThumb are close in terms of my requirements, but all fall short in the area of metadata management.  Of the three, Picasa is better with metadata management, and digiKam is attractive for it's file information viewing and other features.

Bibble Pro version 5 promises to add photo management to it's feature set.  I'm eager to see if it handles my requirements, particularly for metadata management.  I'm interested in incorporating XMP data (I have GPS information in XMP files), which I have yet to see in any tool.

. . . Rob Williams
http://www.robwilliams.ca

Sunday, November 2, 2008

Linux Photography: Photo editing with The Gimp

There is really only one option when it comes to editing photographs using Linux: The GIMP (The GNU Image Manipulation Program). This program has a long history, and has evolved to become a highly functional tool with a decent user interface. I tried using The GIMP a few years ago, and gave up quickly -- it was hard to use, and really told me that Linux tools at the time were not up to professional standards.

Today, the story is quite different. Version 2.6 is now out (2.6.2 is the latest version at the time of writing), and it looks to be as capable as tools I've used on Windows such as PaintShop Pro (please note: I'm not a Photoshop user, so I can't compare The GIMP with Photoshop CS3 or CS4).

The GIMP's windows

The GIMP opens up with a tools window on the left-hand-side, and a layers/channels window on the right-hand-side. There is also an image window in the middle, that allows you to open and manipulate images. All three windows are independent -- they can all be positioned independently although all close if the main window is closed. This is a bit different than other image manipulation programs that I've used, and it takes a while to get used to it.

The tool set is available both from the left-hand-side window and from the window menus on the image window. Image adjustments are available from the Colors and Filters menus. The set of adjustments is quite large, and includes the normal set of colour manipulation, hue-saturation, contrast, levels, curves tools, and so on. There is also a good set of layering tools. Essentially, I was able to do any of the standard set of manipulations that I wanted.

I also found a useful plugin for Chromatic Abberation correction (Fix-CA). This tool is very similar to the CA correction in Bibble Pro. It's very easy and intuitive to use, and a welcome addition for my wide-angle shots!

The one downside for The GIMP is that it only handles 8-bits per channel. On rare occasions, such as handling infrared images, I prefer to produce 16-bit per channel images from raw. This allows me more latitude for making the extreme changes needed to make a good B&W image. Unfortunately, I cannot do this with the GIMP.

The new GIMP is a great tool, and in my opinion, with the exception of 16-bit/channel images, gives me all the power I need in an image manipulation tool.

. . . Rob Williams
http://www.robwilliams.ca

Saturday, November 1, 2008

Recent Work: The Village of Pakenham

Pakenham

The village of Pakenham
is about a 45 minute drive north west of Ottawa, alongside the Ontario version of the Mississippi River. It's a picturesque spot, with a stone five-arch bridge across the river and a shallow falls in front of the bridge.

Storefront in Pakenham


. . . Rob Williams
http://www.robwilliams.ca

Tuesday, October 21, 2008

Recent Work: The Morris Island Conservation Area

Forest along the causeway at Morris Island Conservation Area

The Morris Island Conservation area is located on the Ottawa River, upstream from the city of Ottawa. It has a set of easy trails that wander through the forest, giving some great views of the river and the many small islands in the area.


This past weekend, the main display of leaves had fallen, but the forest's inner trees had lots of colour left. The sun shining through the leaves made the forest glow with colour.


. . . Rob Williams
http://www.robwilliams.ca

Monday, October 13, 2008

Recent Work: The last of the Barrhaven Barns

Barn at Jockvale and Greenbank

When I first moved into the Ottawa suburb of Barrhaven about 20 years ago, there were a number of barns on adjacent farms. It gave the community a distinctly rural flavour -- I enjoyed driving through farms to get home (I still do!). Not all of the barns were in use, but many were still in active use. Slowly the barns began to disappear -- I'm sure some of them were a safety hazard, but the community has grown tremendously in recent years, spreading onto farmland.

Recently, a barn was taken down on Jockvale Road, just beside a massive shopping center. For a long time I had wanted to photograph the barn, but it was difficult to find the right spot and lighting conditions. Unfortunately, I procrastinated too long.

This barn is located on Jockvale Road, immediately behind a shopping mall (it's literally only a few feet away). The mall was built right on top of the old Joackvale Road, leaving the farm and it's barn on an orphan bit of the road. I don't know how much longer this farm will still be in operation with all of the new development going on in the area, but I hope they stay a long time.


. . . Rob Williams
http://www.robwilliams.ca

Sunday, October 12, 2008

Recent Work: Sunset on Whitefish Lake

Sunset on Whitefish Lake

South of Ottawa, the Rideau Canal system consists of many lakes and locks. Whitefish Lake, near Jones Falls, is a large lake with many bays and islands. The dock and boat deep in a bay, catch the late sun just moments before sunset.


. . . Rob Williams
http://www.robwilliams.ca

Sunday, October 5, 2008

Linux Photography: Raw Converters, Part 2

This posting will discuss two for-pay raw converter programs, LightZone, and Bibble Pro. Both of these programs are available on multiple platforms -- Windows, Mac and Linux, and I applaud this approach to producing software products. This decision can cost a company in design and testing costs, but it really opens up the market to all customers.

LightZone represents an innovative approach to the tools for raw conversion.

Main browser screen from LightZone
LightZone opens up in a browser, with the current directory's files in thumbnails across the bottom of the screen. The layout is very natural, with a great colour scheme. I like the information window on the right hand side showing the current image's metadata clearly laid out. Once you have picked the image to edit, you click the "edit" button on the upper lefthand side. It takes a few seconds to bring up the image editor.

Main edit screen from LightZone
LightZone's innovations are clear on this screen. Although the usual exposure and saturation controls are available, there is no curves tool. Instead, there is a zone mapping tool which lets you alter the intensity in each of 16 zones. It takes some time to get used to working with the zone mapper, but I like it better each time I use it. The various tools also stack up on the ight hand side (think "layers"), allowing you to use a variety of different tools and independently control each one, and enable or disable them at will. The workflow is very natural, once you catch on to the way the program works, although to be honest, it's confusing when you first try the program out.

In addition to the individual tools, there are a large set of "styles", which are essentially pre-defined settings for the tools. You can use these for a quick edit, if you don't want to spend time with the standard tools. Each style can be altered with controls as well.

When you are finished editting the image, you press the "done" button which takes you back to the Browse screen. There, you can process the image with the "convert" button on the browse screen. This lets you set the type of file, and other output options. Processing is a bit slow, taking nearly two minutes (1:54) to process a Nikon D200 raw file (until the program itself declared the job "Done").

Overall, I'm very impressed with LightZone, and I'm getting more fond of it every time I use it. LightZone costs $228.04 (Canadian dollars), $199.95 (US dollars).


Bibble Pro 4 is a mature, full-featured product. It's list of features is extensive, including Noise Ninja for noise reduction, lens correction, IPTC metadata editing, and a "blazing fast RAW conversion". Release 4 is available now, but release 5 is imminent.


Bibble Pro 4's main screen

The main screen is laid out well, with the directory browser on the left, thumbnails at the top, and tool menus on the right hand side. The overall look is crowded, though. One of the great benefits of Bibble Pro is the number and variety of tools, but this contributes to the clutter on the GUI. The Bibble Labs website has some screenshots of release 5, and the colours and layout look to be much improved.

The tools are fantastic. It has all of the regular suspects -- curves, sliders for exposure, saturation, contrast, fill light, and the list goes on. One of the big items for me is the lens correction, vignetting correction, and chromatic abberation correction (these are all under the Msc tab on the tools window). Here is a before-and-after example of lens correction:

Lens correction for the Nikon 18-200mm lens

The lens is my Nikon 18-200mm lens at 18mm -- a great lens with some pronounced distortion at various focal lengths. The correction here is bang-on, straightening the top line perfectly. It doesn't handle the perspective issues, but I'm quite happy with the results.

The same photograph shows some chromatic abberation in the post in the background. The next two images show how well the correction works. All you have to do is move the chromatic abberation slider until the colour disappears.

Results of the chromatic abberation tool

These three tools (including the vignetting tool) are enough to weight the decision towards Bibble Pro, and I haven't described the healing tool, support for Noise Ninja (another tool that I purchased separately for Windows), or IPTC support.

Processing speed is the clinching factor in favour of Bibble Pro. This tool simply smokes the competition when it comes to processing the RAW file. On my Linux laptop, processing my Nikon D200 raw files (16MB compressed NEF files) took about 10 seconds, at least 1/3 the speed of any other program I've tried. It's impressive to say the least.

Bibble Pro 5 promises even faster processing speed, an improved look-and-feel, and adds asset management, another essential tool that I'm looking for on Linux.

Bibble Pro 4 costs $159.95 (US dollars), which converts to about $179.93 in real Canadian dollars (sadly, the Canadian dollar has sunk recently to 0.8890 $US). This price gets you Bibble Pro 4 today, and an upgrade to Bibble Pro 5 when it is released.

I'm impressed with the innovation in LightZone, and I believe it will continue to develop into a great tool. I'm more impressed with the toolset and processing speed in BibblePro, so for now, it's my tool of choice for Linux raw conversion.

. . . Rob Williams
http://www.robwilliams.ca

Saturday, October 4, 2008

Recent Work: Reflections on Roger's Pond

Reflections on Roger's Pond

I visited a small lake in Marlborough Forest southwest of Ottawa last weekend, hoping for some sun. Instead, it was dull and overcast, but I thought the reflections of the clouds and reeds in the water were worth the trip.

. . . Rob Williams
http://www.robwilliams.ca

Thursday, September 25, 2008

Linux Photography: Raw Conversion

I was quite surprised to find out that there are choices when it comes to raw conversion software. I found three open source and/or fee raw converters: UFRaw (version 0.13), Rawstudio (version 1.1), and RawTherapee (version 2.3), as well as two for-pay programs, LightZone and Bibble Pro. With so many options, it's too time-consuming to do an exhaustive evaluation of every program. I tried each one out, and got an early impression of which programs were competitive with my tool of choice on Windows, Capture One from Phase One.

Rawstudio is a good-looking open-source program that is continuing to evolve and improve.

The main screen from Rawstudio

The main working screen looks good and is well organized. The filmstrip at the top of the screen shows files from the open directory, making it easy to browse images from a single session. The window at the right shows the main tools for adjusting the image, both with sliders and a curves tool. A histogram is also available at the bottom of the right window if you scroll down.

The tools offer basic image manipulations (exposure, contrast, tint, etc.), but other image tools like straightening, croping are available (although hidden) by right-clicking on the image. Undos are also available, but they are not universally available from the Edit->Revert settings menu selection.
One option I really like is the A/B/C tabs in the right window. These tabs let you try out different combinations of settings to see which one you like the best. The images are easy to compare by clicking each tab in succession.
I have a few quibbles about the GUI -- amongst other issues, the tools could be better organized, undos easier to figure out, and a progress bar on the Export and Batch processing screen would be good. There are also still a few bugs that show up -- for example, the image display sometimes disappears when using the histogram curve to adjust the image.

This program is quite good, and has lots of promise. However, it shows signs of being an young product, and it could use more time to mature. This is a program worth watching.

UFRaw is a fairly basic raw converter, but it works well, and the controls are quite easy to figure out.

UFRaw main screen

The tool menu is on the lefthand side of the screen, with tabs that let you adjust the colour temperature, histogram curves, gamma, crop, orientation, etc. All of the tools are here, and although it's not an extensive set, you can accomplish what you need without much trouble. The histogram/curves tool is a good size, which makes it easy to make fine adjustments.

I don't particularly like the way UFRaw opens files. When you open UFRaw, you are presented with a file system browser, which lets you select the file to edit. This is basic and functional, but it doesn't show you any thumbnails of the images, so you have to know the filename beforehand. The advantage of this kind of browser is that there is more screen real-estate available for the image being processed and tools. It would be much better if the browser showed thumbnails.

Overall, UFRaw is a simple, functional but not fancy tool. It runs well, without any bugs that I ran across.
RawTherapee looks very promising. The display is very well laid-out, with the directory's files in a strip along the botom of the screen.

Raw Therapee's main window

The editing tools are nicely arranged along the right hand side, with the file system browser and edit history on the left hand side. The tool gives you the option of hiding the bottom and left-hand side windows, to give you more space for the image.

The set of tools offered are very good -- a clear improvement over the other two open source/free programs I tried. Among the useful tools were chromatic abberation correction, and vignetting correction.

When I started to edit the photograph, however, strange things began to happen. The image often brightens a huge amount, and I can't restore it to normal. This bug is a show-stopper for me -- I can't see what's happening, and I can't really figure out what is causing it. Sometimes it happens when I'm using the curves to adjust the photograph; other controls also had the same effect. The end result is that this program is unusable for me.

UPDATE: This problem has been resolved in version 2.4m1 -- the latest development snapshot. This is good news indeed.

One other noticable issue is that the adjustments take an appreciable amount of time to show on the preview image. The time is noticably longer than with othe programs, and I often thought that my mouse click had not taken effect.

This program has the best organization of the three freeware programs I've tried, and I've read good things about it elsewhere. It's has a lot of potential, and I really hope the developers work on the processing speed, and other bugs that are discussed on their online forum.

A following post will review the two for-pay products, LightZone and Bibble Pro.

. . . Rob Williams
http://www.robwilliams.ca

Tuesday, September 23, 2008

Recent Work: The Writing's on the Wall

Letters on a container

When I first saw these letters on a container on Whitehead Island, a remote fishing village in the Bay of Fundy, I thought I was seeing Chinese characters. I quickly realized that I was wrong, but I still get the impression of Chinese characters every time I take a new look at the photograph.

. . . Rob Williams
http://www.robwilliams.ca

Sunday, September 21, 2008

Recent Work: Anatomy of a Dany Heatley slap shot

Dany Heatley of the Ottawa Senators
Every September, the Ottawa Senators hold an open practice and a few thousand fans, young and old attend to see their favourite players as well as the up-and-coming rookies. I always take my camera, and at the end of the day, I truly appreciate the skill (and equipment) of professional sports photographers.
This year, I watched Dany Heatley practice his famous slapshots -- a thing of beauty. I set my camera to take continuous shots, and let it go as fast as it could while Dany Heatley wound up and shot. This is the result after I combined all four images together.

UPDATE, October 5, 2008: Dany Heatly just demonstrated his amazing shot in the game against Pittsburgh Penguins in Stockholm, Sweden, giving Ottawa a 2-0 lead!

. . . Rob Williams
http://www.robwilliams.ca

Sunday, September 14, 2008

Linux Photography: Monitor Calibration

I have been testing various software packages as I try to determine the state of the art for photography under Linux.  One of the first steps for serious photography is working on a calibrated monitor.  On Windows, I used a software solution for some time -- PaintShop Pro's monitor calibration tool.  Using this tool, you use sliders to match the intensity of a square on the screen with a standard square.  This is done with various intensities of red, green and blue.  Each colour can be adjusted independently.  The results of this operation, which takes only a couple of minutes, is saved in an ICC profile which is used by Windows, and by the various photographic applications.

This method is certainly the right price (zero), and is reasonably effective.  However, due to some problems getting good output from an outside print shop, I recently switched to a hardware-based calibration tool.  I bought Spyder3 Pro, which uses a colorimeter to measure the output of the screen.  It is largely an automatic process, only requiring you to manually adjust the monitor's hue to get it within a certain range.  So far, I'm quite pleased with the results.

On Linux, the monitor calibration options seem to be quite limited.  I have found a couple of tools so far, GAMMApage and Argyle CMS.  Both tools are free.

GAMMApage is similar to the tool I used from PaintShop Pro.  In this case, there are only three squares to match, one red, one green and one blue.  The output from the operation becomes an adjustment for the X11 windows system, rather than an ICC profile.  Installation of this tool involves unpacking a zipped tar file, and to run, you simply ensuring that the executable python file is on your path.  It's not a fancy tool, but it works fairly well.  

One drawback on Ubuntu is that I will have to recalibrate everytime I boot my system.  GAMMApage has an option to save the settings on the X windows startup.  However, this fails when I try to run it.

Argyle CMS is a tool that supports a range of monitor calibration hardware, from a range of Gretag-Macbeth/X-Rite hardware, as well as Spyder.  Unfortunately, they only support Spyder 2.  I tried to run it with my Spyder 3, but I didn't even get to first base.  The tool requires some information extracted from the installation disk, and this extraction operation failed on my Spyder 3 installation CD.

So, for the time being, I will use GAMMApage, and see how it goes.  From my experience with PaintShop Pro, I know that this solution is sufficient for much of my work, but in the end, the ability to reliably reproduce images on my printer, and deal with outside companies requires a professionally calibrated monitor, and a solution like GAMMApage is problematic.

. . . Rob Williams
http://www.robwilliams.ca

Thursday, September 11, 2008

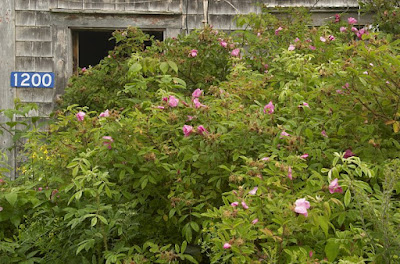
Grand Manan Images: 1200 Route 776

1200 Route 776, Grand Harbour

This house in Grand Harbour has been abandoned for some time. The front yard has transformed into a fantastic wildflower meadow, dominated by wild roses. It is a small property, and easy to miss as you drive past the main part of town, but I have been watching the wildflowers in the front yard for a couple of years now.

Wild Roses

I suppose that the property will be bought at some point in time, and the front yard will be returned to lawn. In the mean time, it's a reminder that nature recovers and will prevail, given time.

. . . Rob Williams
http://www.robwilliams.ca

Friday, September 5, 2008

Is Linux Ready for Prime Time Photography?

I am a software developer by profession, and I have been writing code for Unix systems (and inside the Unix kernel) for most of my professional life.  I have always thought of Unix as a good system for software R&D, but a poor system for a consumer's desktop.  For years this was the case, despite a movement of Unix and Linux into the server market, and constant talk of Linux as a home desktop.

This has all changed recently with Ubuntu, a Linux system that is easy to install and run, and with the availability of free, top-notch applications like Open Office for documents, spreadsheets, presentations, Firefox for web browsing and, Thunderbird for email, all of which run on Linux systems (as well as Windows and Mac).

Despite my continuing use of Windows XP at home, I use as much open-source and free software as possible.  However, I have always used purchased, Windows-based applications for photography.  Whenever I have searched for Linux-based photography apps, I have been disappointed with the quality and functionality of what was available.

For the past year or so, I have been using Ubuntu at work, and we have also converted one of our home laptops to Ubuntu to prolong it's useful life.  Even though Windows XP is a reasonably stable platform, the thought of having Vista in my future is frightening.  I thought it was time again to see what photo software was available, either as freeware, or for purchase to run on Linux, and on Ubuntu in particular.

I use a number of different applications for photography on Windows:
  1. a raw converter, Capture One
  2. a photo editor, Paint Shop Pro
  3. a photograph display and management tool, ThumbsPlus
  4. a generic scanner driver, Vuescan
  5. a digital noise filter, Noise Ninja
  6. a panorama image sticher, Panaview Image Assembler
  7. a program to create and manage my website, FrontPage (no longer in production).
  8. monitor calibration software (and hardware).
All of this software was purchased, and most (except for Vuescan) have ongoing costs to acquire new versions.  I'm sure that I could reduce the number of applications that I use, since many apps support several of these functions.  However, with a limited budget, I have been able to find high quality applications at a low price, and buy them whenever I could afford to do so.

I will have to replace all of these functions in order to switch my desktop to Ubuntu.  In the next few posts, I will look at each application area in turn, and see how Linux apps stack up.  The end result is not yet known -- however, I have been very pleasantly surprised in my research so far.

. . . Rob Williams
http://www.robwilliams.ca

Friday, August 29, 2008

Grand Manan Images: The Flock of Sheep

Flock of Sheep

The Flock of Sheep is a set of glacial boulders sitting on top of the darker volcanic basalt on the southern end of Grand Manan Island. From the sea, these boulders look like a line of sheep on the shore (at least kind of), and that's how they got the name. While on our trip out to Machias Seal Island from Seal Cove, I saw this formation for the first time, and I was determined to hike there to see them close up. The hike is actually quite easy, given that we could start out from the beach at South-west Head. From there, it's a 10 or 15 minute walk along a cliff-side path to the formation.

Looking out to sea from the Flock of Sheep

This set of boulders, one of which is precariously sitting on the edge of the cliff, is actually the "Lower" Flock of Sheep. There is another set slightly further north, called the "Upper" Flock of Sheep. I'll get there next year!
. . . Rob Williams
http://www.robwilliams.ca

Wednesday, August 27, 2008

Grand Manan Images: Grass at Pettes Cove

Grass at Pettes Cove

When I got to Pettes Cove, the fog was thick, and it was raining. The cove itself was dreary, but I got out of the car just long enough to photograph some grass just beside the car. I like the image in quite a bit in colour, but it really looks good in black-and-white -- the photograph is pure texture.

. . . Rob Williams
http://www.robwilliams.ca

Sunday, August 24, 2008

Grand Manan Images: Red Rocks at Red Rock Point

 
Red Rocks at Red Rock Point
These rocks lie at the base of an indent in the cliffs, exposed at low tide.  I'm sure these rocks are responsible for literally carving out their own niche in the cliff, thrown about by storms and tides.


. . . Rob Williams
http://www.robwilliams.ca

Saturday, August 23, 2008

Two interesting announcements: Photosynth and TinEye

This past week I saw two interesting photographic announcements.

One announcement was Photosynth, a Microsoft endeavour that I first saw demonstrated in a short but mind-blowing Ted Talk by Blaise Aguera y Arcas. This is a fascinating application that combines a large number of photographs into a single "3D" continuum. You can browse the images, zoom in, out and move around, essentially providing a higher-order view of the images. It's quite amazing when the "synth" is done well. This "synth" of the Temple of Heaven in Beijing is a good example. The Photosynth website opens up this application to anyone who wants to try it.

A second announcement was TinEye Image Search, the kind if image search that I've always wanted, and the kind I expected Google to offer. This search engine uses a photograph as a search key, and uses pattern recognition to find that image on the web. It can also find alterations to the image, or use of the image in a collage. This concept is great -- it offers a way to see how an image is being used on the internet. The main drawback right now is that the image database is limited in size, and to be honest, it's too small for any practical use. However, the database is constantly expanding, and at some point it time, it will reach a critical mass of images. It's clear that this is a small start-up comany with a great idea. Hopefully they will get sufficient funding to make this search engine a go (or look for them to be acquired by one of the major players).

I really like the Photosynth app because it opens up a completely different way to process images -- a different concept of how to use and think about the billions of images available. In fact, both of these announcements open up the use of images on the web in a whole new way.

. . . Rob Williams
http://www.robwilliams.ca

Sunday, August 17, 2008

Grand Manan Images: Castalia Beach

Castalia Beach at Sunset
The fog was thick in North Head, but at Castalia it was clear. This view looks north towards the fog bank which was letting the red glow of the sun peek through.

. . . Rob Williams
http://www.robwilliams.ca

Grand Manan Images: Men with Hats

Men with Hats
While driving along the Ingalls Head road towards Ingalls Head, you can see a line of posts with what looks like plastic buckets on top. So when the time came (i.e., a nice sunrise), I went out to see what these "men with hats" were all about. Well, here they are -- posts with old tires to protect some infilled land.

I almost called this post "We stand on Guard" using a phrase from Canada's national anthem. Instead, I used the first and only phrase that comes into my mind whenever I see these posts, "Men with Hats" after the musical group Men Without Hats.

. . . Rob Williams
http://www.robwilliams.ca

Wednesday, August 13, 2008

Grand Manan Images: A Midsummer Cushion

A Field of Flowers, Grand Manan Island

My wife, Wendy, saw these flowers beside the road on the southern part of the island, and named them "A Midsummer Cushion" after a custom in rural England in the 1600s or 1700s. People would cut a section of flowers out of the turf, and bring them indoors for decoration. The only reference I can find to this practice online is from the English poet John Clare who wrote in the early to mid 1800's. He wrote that "a very old custom among villagers in summer time to stick a piece of greensward full of field flowers and place it as an ornament in their cottages which ornaments are called Midsummer Cushions". He used this as the name of a collection of poems, that was not published until 1979.

A small part of the cushion

The weather on the island this year was perfect for photographing grasses and flowers like these. There was a lot of overnight rain, and of course, fog, especially on the southern part of the island. The wet conditions intensified the colours, and the overcast sky gave a very even light. The only problem was that I had to use a long exposure, and I had to wait until even the faintest breeze stopped to get a really sharp photograph.

Every time we passed these flowers, I thought of the "midsummer cushion", and I could almost imagine myself living two or three hundred years ago, walking through the fields of wildflowers.

. . . Rob Williams
http://www.robwilliams.ca

Sunday, August 10, 2008

Grand Manan Images: Buoys

Buoys at Ingalls Head

I love the look of fishing buoys, especially when they've been weathered like these. The colours remind me of a set of crayons after being worn down.

For more photographs of Grand Manan Island, see http://www.robwilliams.ca/Landscapes/Grand_Manan/grandmanan5.htm

. . . Rob Williams
http://www.robwilliams.ca

Saturday, August 9, 2008

The Ross Island Lighthouse

Ross Island Lighthouse at Fish Fluke Point

The lighthouse at Fish Fluke Point on Ross Island has been abandoned for 44 years, and as you can see, it is crumbling. It is highly endangered, and continues to deteriorate in the face of hostile weather. Unfortunately, the island is privately owned, and nothing is being done to preserve this dramatic and important landmark.

Getting to Ross Island is an adventure all on it's own. At low tide, and for a couple of hours on either side of low tide, you can walk to the island from the end of Thoroughfare Road in Grand Harbour -- there is still water flowing on the path, but with some carefully chosen hops, you can get across with dry feet. However, you have to keep careful track of the time, and not overstay. The tide returns quite quickly, and the path is dangerous if it's under water.

I wanted to visit the lighthouse close to sunset, so I picked a day where sunset corresponded with low tide, and hiked to the lighthouse with my daughter. The day was overcast, but the lighthouse is dramatic in any light. We arrived at 8:15pm after a 35 or 40 minute walk, and unfortunately only had a few minutes to photograph in the fading light. I didn't want to be walking on an unfamiliar trail in the dark, and with the tide returning!

I plan on returning to Ross Island the next time we visit Grand Manan, and photographing the lighthouse in different kinds of light. It may be the only way this lighthouse will be remembered.

For more photographs of Grand Manan Island, see http://www.robwilliams.ca/Landscapes/Grand_Manan/grandmanan5.htm

. . . Rob Williams
http://www.robwilliams.ca

Dawn at Grand Harbour

Dawn at Grand Harbour
During our visit to Grand Manan Island, there was only one clear morning. When I realized that the sun would actually appear at dawn, instead of the ever-present fog, I immediately drove to a nearby spot along Ingalls Head Road that I had previously scouted as having good possibilities.

At low tide, a significant amount of the harbour drains to expose rocks, seaweed and sea grass. The tide in this area is around 5 or 6 meters between high and low tide.

Coral Weed, Grand Harbour
. . . Rob Williams
http://www.robwilliams.ca

Wednesday, August 6, 2008

Grand Manan Images: Swallowtail Lighthouse

Swallowtail Lighthouse

Swallowtail Lighthouse near the northern tip of Grand Manan Island is probably the most visited and photographed site on the island. It is particularly stunning at sunrise, whenever the sun breaks through the fog. This year, we visited the lighthouse at sunset hoping for strong dramatic light. Just after we got to the lighthouse, the sun went behind some high clouds, but it still managed to give us a gentle warm glow that went very nicely with the grass blowing in the wind.

. . . Rob Williams
http://www.robwilliams.ca

Monday, August 4, 2008

Trip to Grand Manan Island, New Brunswick

   Cliffs at Long Eddy Point, Grand Manan Island

I have just returned from a yearly trip to Grand Manan Island in the Bay of Fundy, and I'm finding the transition from island life to city life more difficult every year that we make this trip.  What more can you say about a lifestyle where the evening's entertainment is to go out to a lookout with the whole family to watch the sunset, or to the ocean to collect rocks and shells?  It may not be paradise for some people, but it is for me, at least for a couple of weeks every year.

As usual, photography at Grand Manan is fantastic, but you have to be prepared to photograph with rain and fog as constant companions.  June and July in particular are known to be months for fog, but I've been told by some of the Grand Manan-ers that I've talked to that August and September have more sun.  Hopefully we'll test out this advice the next time we visit.

As I go over my photographs from the island, I will be posting new images as they get produced, so be sure to check back here often over the next couple of weeks.

. . . Rob Williams
http://www.robwilliams.ca

Tuesday, July 8, 2008

Unexpected benefits from long-term projects

Chicken coop along Regional Road 16
This past spring, I decided to renew a long-term project that I started a couple of years ago, to photograph the locks of the Rideau Canal.  The Rideau Canal runs between Ottawa and Kingston on Lake Ontario, and was designed and built between 1826 and 1832 in the aftermath of the War of 1812.  The canal was recently declared to be a World Heritage Site, and I though that photographing the locks would be a good project for me to get out with my camera.
Merrickville Ruins
As I travel further and further afield to find the lockstations, I've had the opportunity to see a lot of countryside southwest of Ottawa as well as some of the towns and villages.  Even though I"m often travelling somewhere else, in a rush to get the early morning light, sometimes the countryside scenes are too tempting to pass by.
 
Unused barn entrance
I've really enjoyed driving through the eastern Ontario countryside -- and photographing some of the scenes has been a quite unexpected side benefit from my Rideau Canal project.  More on this project will be in later posts.
. . . Rob Williams
http://www.robwilliams.ca

Friday, July 4, 2008

Recent Work: A View from Hog's Back Locks


I am very impressed with the designers of Saint John the Baptist Ukrainian Catholic Shrine in Ottawa. The sight lines of this church are amazing. In an earlier post in May, I photographed the church from a road in the Experimental Farm.

Last weekend, I found this view of the church reflected in the Rideau Canal from the locks at Hog's Back, south of the city -- what a fantastic sight.

. . . Rob Williams
http://www.robwilliams.ca

Recent Work: Sumac Leaves


This is one of the images I have "pictured" every day on my way to work. Finally, on a cloudy weekend, I went out to see if I could make an image that lived up to my mind's eye. I think it does.

This photograph earned me a visit from a security patrol -- evidently this sumac is on property owned by a secret government department that doesn't like people wandering around with a camera and 80-200mm lens. Despite the fact that the area is thickly forested and no buildings or other equipment was remotely visible, I dutifully stopped photographing after the visit.

Oh well -- maybe I should get a different route to work!


. . . Rob Williams
http://www.robwilliams.ca

Thursday, June 19, 2008

A Bog Blog Posting

I have always loved visiting bogs and seeing the fantastic plants that grow in that environment. Bog plants symbolize ingenuity and perseverance to me -- their strategies for survival are fascinating.

The Round-leaved Sundew in the photograph is a carnivorous plant that grows in bogs. They are quite small -- these leaves are only about a centimeter wide, and are covered with hairs that each have a drop of sticky fluid. Insects can get stuck on the hairs, and the plant slowly absorbs the nutrients from the insect.


. . . Rob Williams
http://www.robwilliams.ca

Sunday, June 8, 2008

The Joys of June


Wildflower photography in June brings a whole new gallery of wildflowers to the fore. The spring beauties, hepaticas, trout lilies and trilliums are gone, but the forest is still full of new flowers. Unfortunately, it also brings a host of bugs -- mosquitos, black flies, deer flies, horse flies and inumerable other creatures make the forest a very difficult place to make photographs.

This morning I got up with the sun and headed west -- I hadn't made up my mind exactly where, but I decided to let the weather make up my mind for me. It was mostly cloudy, with the kind of high cloud that makes landscapes difficult. So, I decided to head for the Marlborough Forest, just south-west of Ottawa. I had read about a trail in that forest that had a good variety of wildflowers, including Ram's Head Orchids which I have never seen.

I knew the area would be wet and that is the perfect condition to also breed lots of mosquitos and other insects. I wore my usual mosquito protection -- a hat, long pants, and bug spray on everything exposed, except for my hands. Bug spray is very corrosive, so I have to sacrifice my hands to save my equipment.


I thought I was well prepared, but I didn't account for the heat and humidity. We're in the middle of the first heat wave of the season. Early this morning it was only 18 degrees (Celsius) when I got up, but the high for the day was over 31, so it heated up very quickly. By the time I was in the forest looking for orchids, I was sweating profusely. The mosquitos were ecstatic! Every time I stopped, they lit on any unprotected area. They bit through my shirt, through my pants, on my hands, around my watch (which I also didn't spray with repellant), and twice around my eyes.


I was lucky enough to find Yellow Lady's Slippers -- also a flower that I have never photographed before, as well as a number of Columbine and Canada Anenome. No Ram's Heads, though. All in all, some good photography, and some very happy mosquitos.

. . . Rob Williams
http://www.robwilliams.ca
Friday, May 30, 2008

The Ottawa Marathon


Ottawa has so many festivals and events that it's hard to keep track of them all. One event that I have never attended before this year is the Ottawa Marathon. I had been to other events during the Ottawa Race Weekend such as the 10K run, but not the Marathon.


This year, I was determined to see the Marathon, and see if I could take some interesting photographs. I downloaded the route for the marathon from the web, and planned out where I wanted to be located. With most of the downtown roads closed or blocked, I had to walk from one spot to the next, so I was quite limited in my choices (some of the working photographers had motorcycles to get around). I wanted to see the start of the marathon, and I knew that I could see the runners cross the bridge from Gatineau into Ottawa at Nepean's Point near the National Gallery. After that, I thought that I would have to go to the finish line, and wait for the end of the race, at least for the elite runners.


So, early Sunday morning, I arrived downtown in good time to get a spot close to the starting line. I arrived at 6:15 am -- with time to spare for the 6:55 start of the wheelchair marathon, and the 7:00 start for the main marathon. The number of people at the start line was impressive for such an early time on Sunday, but as it turns out, a fraction of the number out at 9:00am for the start of the Half Marathon. Many runners posed for photographs at the start line, and some for self-portraits.

The first to appear on Alexandria bridge were the three wheel-chair athletes, followed by a pack of elite runners, and other lead runners. They were followed by the main pack of runners, still bunched up from the start of the race, but beginning to stretch out.


I must say that I am very impressed with the number of people in the race. Just finishing a race like this is impressive. I can't imagine running for four hours straight, as literally thousands of people in the race were able to accomplish. The photograph below was at the 10km mark in the race, about 45 minutes after the start. This many people running 10k in 45 minutes is amazing, and I take my hat off to all of them.


I was really neat to see how many people were out to encourage the runners, and how much the runners appreciate the applause. I could see how some runners were literally pumped up by the audience at the side of the road. The audience ranged from photographers to people with megaphones, family members, and just regular onlookers who would applaud every runner who passed.


After the main pack of runners passed the 10K mark, I walked to the corner of Sussex and Wellington to see some of the faster runners pass, and then I went to look for the finish line. However, when I got to Confederation park where the start line is located, there were a massive number of people waiting for the start of the half marathon. Elgin Street was packed with runners, and the park was filled with friends and family. I took some more photographs of the crowd, but then decided that the finish line was too crowded to get a good view. Next year, I'll be better prepared for this end of the race.


It was a great experience to attend the Marathon. I'll mark this race on my calendar for another outing next year. For more photographs of the race, see http://www.robwilliams.ca/Ottawa/Ceremonies/marathon.htm

. . . Rob Williams
http://www.robwilliams.ca